Xilinx tools and Git: Vivado

In the previous post we reviewed in detail how to adapt the Xilinx Vitis HLS project to Git workflow. This article describes how to achieve the same goal with Xilinx Vivado.
Simple project with Verilog/VHDL only
Let’s start with a freshly created Vivado project with two Verilog source files:

If we look at files generated by Vivado we will find some incomprehensible things:

In general, example.xpr is the actual project file. But a closer look reveals the same situation as in the case of Vitis HLS.
There is a lot of data that will definitely be changed across different PCs, Vivado versions and just over time:

It makes us find universal methods of project saving and loading again as we did it with Vitis HLS. And Tcl scripting integrated into Xilinx tools will also help us this time.
Running Tcl in Vivado
There are several ways to run Tcl scripts and commands in Xilinx Vivado. One of them is to pass a script name as command-line argument to Vivado:
vivado -source script.tcl
Separate commands can be run through Vivado Tcl Console. Also, Tcl Console can execute the script line-by-line:
source script.tcl
Saving the project
Fortunately, Vivado already has a way to save the project as a Tcl script:
write_project_tcl -no_copy_sources example.tcl
After executing this command in the Tcl Console, Vivado produces a file named example.tcl in the current directory:

Let’s examine it a bit. The most noticeable feature is that source file search is made relative to the current directory and no absolute paths are mentioned (except list of remote sources in header comment):

This Tcl script should be stored in the Git repository along with source code files. It is enough to recreate the project. Other files generated by Vivado can be deleted.

In fact, it’s better to run write_project_tcl in the following form:
write_project_tcl -no_copy_sources -force [current_project].tcl
The -force key allows us to overwrite the existing Tcl script. Using the current_project command gives us the current Vivado project name automatically.
Also, the project Tcl script can be cleaned up from commented artifacts pointing to current PC:
set pathToRemove [file dirname [file normalize [file dirname .]]]

set f [open [current_project].tcl "r"]
set cleanScript [regsub -all $pathToRemove [read $f] ".."]
close $f

set f [open [current_project].tcl "w"]
puts -nonewline $f $cleanScript
close $f
Loading the project
To restore our project from the Tcl script, we can do the following:
vivado -source example.tcl
Or in GUI: Tools > Run Tcl script… > Select “example.tcl” > OK.
Vivado will recreate our project from scratch and we can continue to work on it.
Project with Block Design
Sometimes we have to use Block Design in a Vivado project. So, let’s create a piece of Block Design in our example project.
We must specify the BD directory explicitly and not select the “Local to Project” option:


To write this project as a Tcl script we should add -use_bd_files option:
write_project_tcl -no_copy_sources -use_bd_files -force [current_project].tcl
This option means that Vivado will use BD files directly instead of writing Tcl code to the script for recreation of such designs from scratch. If BDs are nested or just too complex, Vivado may fail during running such Tcl code, so it’s easier to store them as separate files.
After a closer look at the script, it turns out that design_1.bd and corresponding HDL wrapper are added to the project:

Thus, we should add them to our Git repository. These are all the files required to recreate the project:

Project with Block Design and custom HLS IP
Another popular case for consideration is the presence of a custom Vitis HLS IP in the Vivado project.
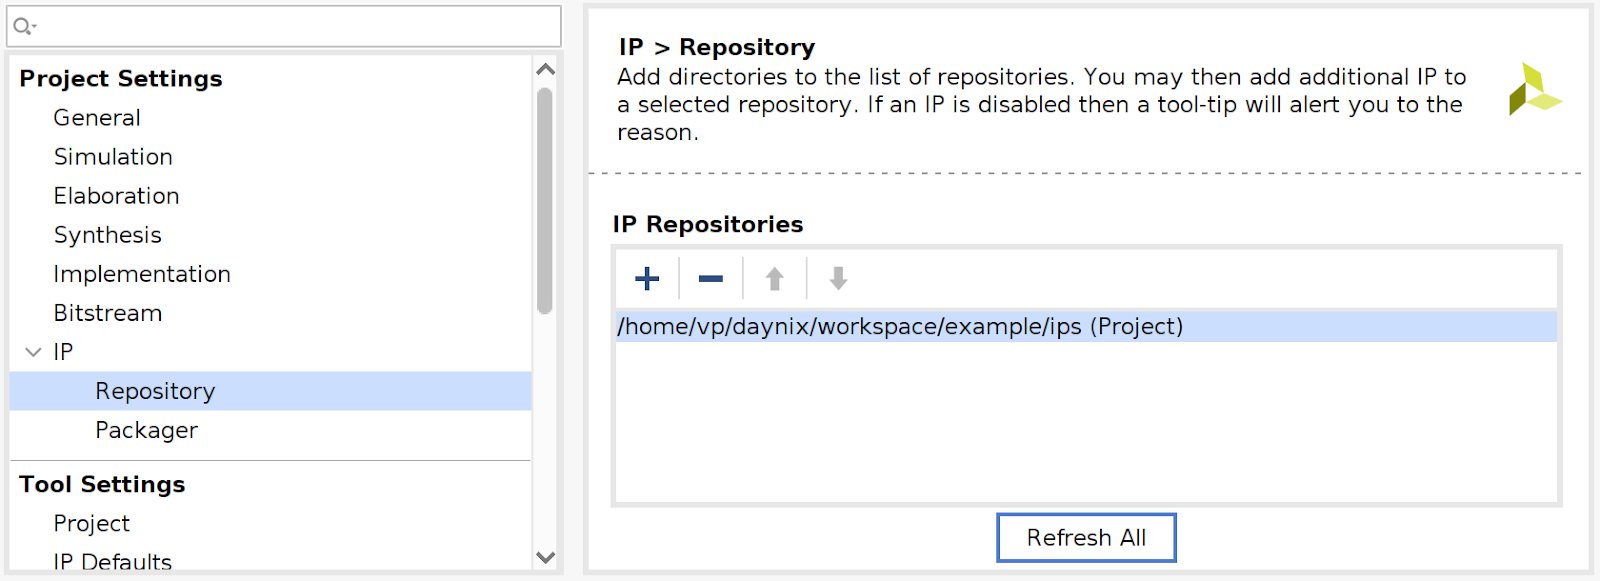
Suppose we have a directory named ips added to the project as an IP Repository:
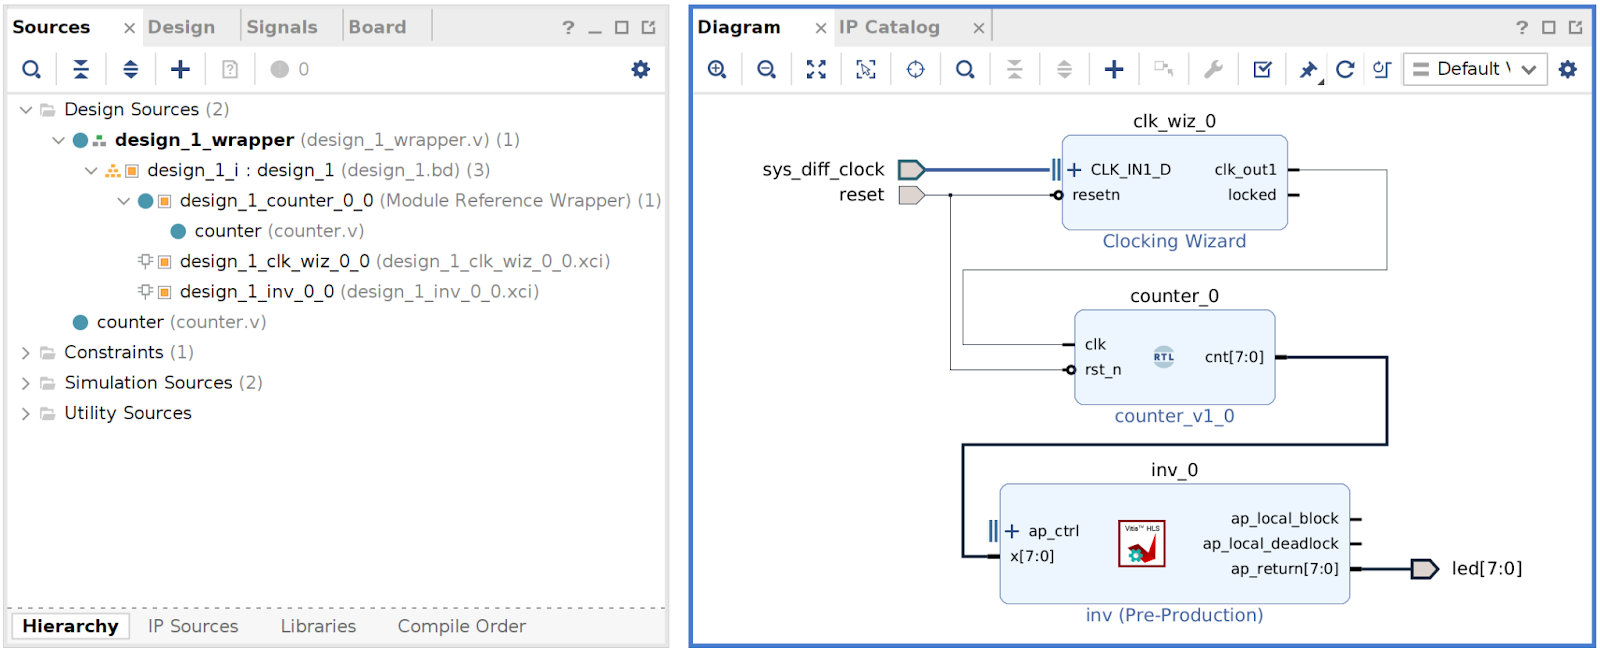
Vitis HLS IP is added to the design_1 Block Design:

The project is written to a Tcl script in exactly the same way:
write_project_tcl -no_copy_sources -use_bd_files -force [current_project].tcl
Inspection of example.tcl shows that ips directory is added to the project in a relative manner as an IP repository:

So, the full set of files for the project looks like the following:

The empty.txt file exists to preserve the ips directory in the repository, because Git can’t store empty folders.
Project can be fully recreated in the following way:
- Build and export Vitis HLS IP to ZIP file with
export.tcl - Uncompress ZIP file to
ips - Recreate Vivado project with
example.tcl
Step 1 was discussed in the “Xilinx Vitis HLS and Git” article.
Conclusion
We have discussed how Tcl scripting helps to save and load Vivado projects with and without Block Designs and HLS IPs to the Git repository. Of course, Vivado has a lot more scripting options, but only several commands are needed to work with Git.